
Input Screen – Creating Image List and Editing Images
How to Organise and Edit Screenshots for Stitching
Here, you’ll see the images you’ve selected at Home, which form the image list for stitching. Before processing the images on the next page, you can fix the image order and edit any of them as needed.
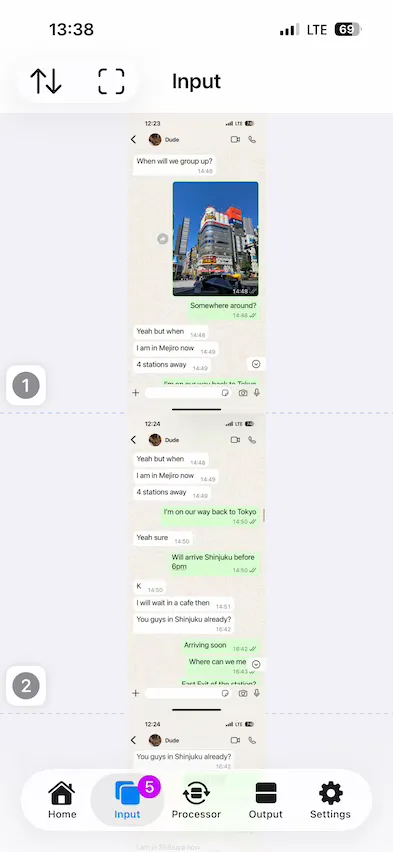
🤓 Tip: Touch and Hold for More Options
Throughout this page, if you see an image or an on-screen button, touch and hold it to open a pop-up menu with advanced actions, position settings, or alternative shortcuts.
Image Count & Error Fixing
The page tab shows the image count. If it turns red with an exclamation mark, there are issues with the images. For example, Breezyone might think the images aren’t suitable for stitching together because their widths or heights differ too much.
💬 Remark
If the count shows
3!, it means that errors are found within these three images.
To fix the errors, just tap the Exclamation Mark on each image to see what’s wrong.
1. Viewing and Inspecting Images
Use simple gestures to check details or zoom in on specific parts of your screenshots.
| Action / Item | Behaviour |
|---|---|
| Double-tap | Zooms in on the image; double-tap again to zoom out. |
| Pinch | Freely zooms in and out using two fingers. |
Image Info ⓘ Top Menu Button / Numbered Icon Button, e.g. ① | Tap the button to switch between image name, dimensions, or date. |
Long-image Button (if any) | Tap to view full image content. |
These actions work even under different editing modes mentioned below.
2. Organise Images
Manage the layout and flow of your screenshots before stitching.
| Action | Behaviour |
|---|---|
⇅ Image List Top Button | Tap it and then Edit List to turn on editing mode (images will gently shake); tap Done to exit. |
| Touch & Hold | Turns on editing mode (images will gently shake); tap Done to exit. |
| Drag & Drop | Moves an image to specific position in the list. |
⊖ Deselect Top Button | Tap to deselect all images. |
⊖ Deselect Button | Tap the button on an image to deselect the image from the list. |
Scrolling Direction
By default, the direction is set to go downwards, which is what usually happens when you take screenshots while scrolling from top to bottom. You can change the direction by tapping the Image List Top Button ⇅.
Even though there are only four main directions to choose from, Breezyone can also handle off-axis deviations for screenshots that are freely scrolled. To do this, just pick the main direction (like up, down, left or right) and ignore any wobbling or skewing. For example, if you scroll down a map and then to the left and right to snap the content, the suitable option is downward.
🤓 Tip
No matter what direction you choose, make sure the images overlap a bit so Breezyone can spot the overlaps and align them automatically.
3. Editing and Adjusting Images
Save time by trimming unwanted headers and footers directly in the app—perfect for vertical stitching of sideways slides or carousel photos without needing an external editor. Adjust how images align with one another.
| Action | Behaviour |
|---|---|
⛶ Edit Image Top Button | Tap it to turn on editing mode (cropmark will appear around an image); tap Done to exit. |
| Tap | Tap an image to select it for editing (cropmark will appear around the image); tap Done to exit. |
| Drag | Drag a cropmark or an image edge along the scroll direction to crop an image. The cropmarks will switch their colours once cropped. |
| Touch & Hold | Opens a pop-up menu to view full image, access and reset cropping and alignment settings. |
Reset Button | Tap it to reset the cropping & alignment settings of a specific image. |
| Alignment Options | Tap to choose an option to adjust how an image aligns with its neighbourhoods. |
Reset All Top Menu Button | Tap it to reset all the cropping & alignment settings of all images. |
More Advice on Cropping
Here are some other situations where you would want to crop images in Breezyone:
- If you end up with unwanted bits on the stitched image, cropping them out beforehand can make things look much better.
- If the two images don’t overlap enough to line them up automatically, Breezyone can stitch them together edge-to-edge after you crop them.
🤓 Tip
You can find some examples on Breezyone’s Gallery to get a feel for it.
More Advice on Alignment Options
The default option of automatic image alignment works great most of the time. However, you may switch to any of these options to adjust the alignment where you see fit.
| Option | Description |
|---|---|
| Auto-align (Default) | Automatically detects overlaps and aligns the images for you. Works great most of the time. |
| Direct-align | This disables automatic alignment and joins the two images together edge-to-edge. It is suitable when you have already cropped and aligned the two images in the desired positions. |
| Must-align | This is useful when the overlaps between two images are tiny. Breezyone will try stitching together the images with the best possible alignment. |
Version: 1.5.6
Updated: Thu Jul 30 2026 08:00:00 GMT+0800 (Hong Kong Standard Time)